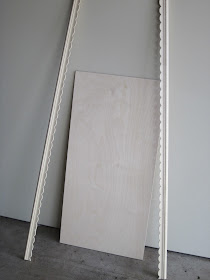
- Piece of 3x1' pre-cut wood
- Two 3' long pieces of decorative wood panels
- Box of 3.5" long nails (wanted to have enough room to place thread spool & matching bobbin thread)
I figured I'd used my leftover teal spray paint from the mason jar vase, to color the whole thing...but more on that later...
From the 'panels', I cut & sanded 2 pieces (12" long) to be go along the top & bottom, then cut 2 pieces (34" long) to go along the sides.
Then I used wood glue to adhere those to the main piece of wood.
Then I used wood glue to adhere those to the main piece of wood.
While the glue was drying, I decided to spray paint the nails white...I could've left them silver, but didn't think that would look as pretty. So I dug around and found an old piece of super thick poster-board...and poked the nails thru it to keep them upright...that made it easy to spray them all quickly and thoroughly. YAY!
 |
| spray painted nails - before & after |
After the glue completely dried, I screwed on a toothed picture hanger on the back. Gettin closer...
Then I began to use the teal spray paint....one problem, it wasn't really adhering onto the wood!! Crap.
I realized forgot primer. Double crap.
So I got a baby wipe & tried to get off as much as a I could. Not all of it would come off.
Plan B...Acrylic Paint.
Luckily I had a few back up colors that I scored at Michael's forever ago for just $.49 each - mustard yellow and coral. Coral won. And Kapri was SO happy to help me paint with a little sponge brush! Thank goodness it was a dark enough color to cover the little bit of teal spray paint that I couldn't get off. Phew.
After the paint dried I *attempted* to put in all the nails...32 total.Only to realize this must be the STRONGEST piece of wood on the planet. The damn nails would NOT go through, and it's only like 1/2" thick...what the?? My neighbors must've wondered why there was crazy banging noises coming from my garage. My thumb & first finger on my left hand were so incredibly sore (almost raw even) from tightly holding onto the nails for so long. Oye.
Plan C...use less nails...only 21 now (sad) & bust out the cordless drill - time to get crazy.
*sigh*...another near fail. Even on the "drill hole" setting, the wood still put up a fight. I literally had to put my body weight onto the drill to get a tiny little hole...From there I dipped the tips of the nails in some E6000 glue and put them in each hole...then put another dollop of glue around the edges. I figured the aesthetics wouldn't really matter at the base of the nail, since the spool of thread would totally cover it anyway.
Then we wait...and wait...a little more glue...and a little more waiting. I. Hate. Waiting. for things to dry. It took about 4 days total...now finally - SUCCESS!!!!
Now my beautiful thread has a beautiful little home!
I kept the other one too, which I'll use in addition to this one and will be a good place for my embroidery thread since I don't have as many of those...yet ;-)


Great idea!
ReplyDeleteThank you :-) Although I'm thinking I'll have to re-do this to include more nails in order to hang more thread spools!
DeleteGreat idea! It is very useful for those who cannot imaging the life without sewing, just like me :) http://custom-paper-writing.com/blog/english-coursework resource has much interesting materials
ReplyDelete