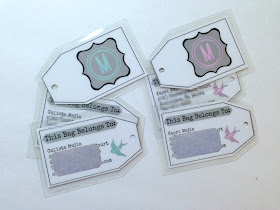
I found a simple blank 'tag' template in Google images, saved it & uploaded to PicMonkey (in "Overlays" - click on "Your Own" button), where I was working on a blank white image. From there I duplicated the image & flipped it (for the back side of my tag).
Then I filled in the left side with my contact info and the right side with a cute logo "M" for my last name....repeat 2 more times for a total of 3:
Finally I printed each out (one for me & one for Kapri) on cardstock, then went to Staples to cut them out, fold them & get them laminated...cost me less than $2!
When I got home, I used a hole punch to go through the circle, then used some elastic cord to loop them onto my luggage handles, carry-on bags & K's carseat. I love how they turned out...super easy, custom, unique, inexpensive & durable! SHOOT - just realized I don't have a pic of one attached to the luggage... I'll have to do that soon! haha
Linked up to:


Oh my gosh these luggage tags are so cute. I travel a lot for business so love having pretty travel accessories. I especially like the logo with the letter of your last name. Such a good idea. Pinned and thanks for the idea!
ReplyDeleteThanks Helen! Definitely give it a try...with a few spare minutes you can make your own in no time and for super cheap!
DeleteLove your tags, and your tutorial is great! The fact that they are laminated makes them even more durable. Thanks,
ReplyDeleteI linked over from the Homemade by You Party where I am participating too with Spooky Spider Card and would love it if you'd stop by.
Hugs, Antonella :-)
Thanks again :-)
DeleteI agree with Helen, not only cute but it is also eye-catching and very compiling. Great Design!
ReplyDeleteLuggage are very useful for daily life and company names tag and company name badges are define different categories of luggages.
ReplyDeletemagnetic badges & photo ID badges